
How to make a Augmented Reality ( AR ) sample app in android
OR
How to make camera filter like snapchat using AR in android
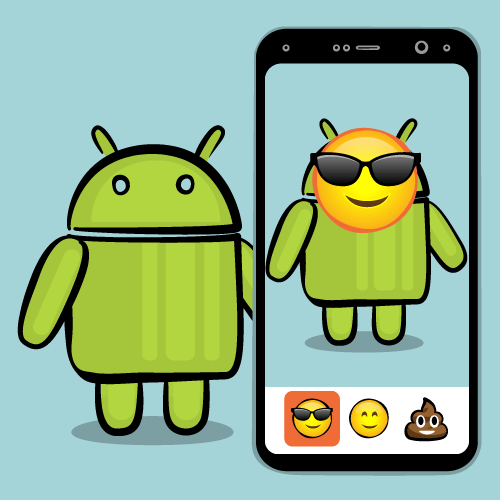
If you’ve ever used Snapchat’s “Lenses” feature, you’ve used a combination of augmented reality and face detection.
Augmented reality — AR for short — is technical and an impressive-sounding term that simply describes real-world images overlaid with computer-generated ones. As for face detection, it’s nothing new for humans, but finding faces in images is still a new trick for computers, especially handheld ones.
Writing apps that feature AR and face detection used to require serious programming chops, but with Google’s Mobile Vision suite of libraries and its Face API, it’s much easier.
In this augmented reality tutorial, you’ll build a Snapchat Lens-like app called FaceSpotter. FaceSpotter draws cartoony features over faces in a camera feed.
In this tutorial, you’ll learn how to:
- Incorporate Google’s Face API into your own apps
- Programmatically identify and track human faces from a camera feed
- Identify points of interest on faces, such as eyes, ears, nose, and mouth
- Draw text and graphics over images from a camera feed
Note: This tutorial assumes you’re experienced in Android development with Java.
What can Google’s Face API do?
Google’s Face API performs face detection, which locates faces in pictures, along with their position (where they are in the picture) and orientation (which way they’re facing, relative to the camera). It can detect landmarks (points of interest on a face) and perform classifications to determine whether the eyes are open or closed, and whether or not a face is smiling. The Face API also detects and follows faces in moving images, which is known as face tracking.
Note that the Face API is limited to detecting human faces in pictures. Sorry, cat bloggers…

The Face API doesn’t perform face recognition, which connects a given face to an identity. It can’t perform that Facebook trick of detecting a face in an image and then identifying that person.
Once you’re able to detect a face, its position and its landmarks in an image, you can use that data to augment the image with your own reality! Apps like Pokemon GO, or Snapchat make use of augmented reality to give users a fun way to use their cameras, and so can you!
Getting Started
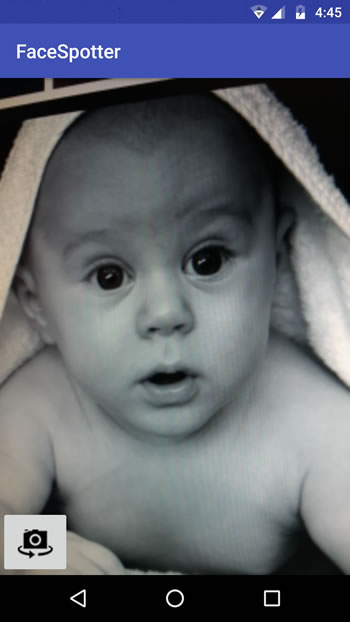
Download the FaceSpotter starter project here and open it in Android Studio. Build and run the app, and it will ask for permission to use the camera.

Click ALLOW, then point the camera at someone’s face.
The button in the app’s lower left-hand corner toggles between front and back camera.
This project was made so that you can start using face detection and tracking quickly. Let’s review what’s included.
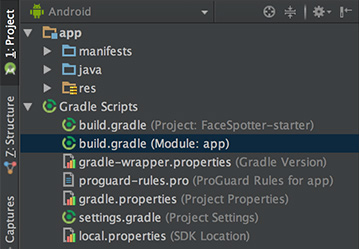
Project Dependencies
Open the project’s build.gradle (Module: app):
At the end of the
dependencies section, you’ll see the following:
compile 'com.google.android.gms:play-services-vision:10.2.0'

compile 'com.android.support:design:25.2.0'
The first of these lines imports the Android Vision API, which supports not just face detection, but barcode detection and text recognition as well.
The second brings in the Android Design Support Library, which provides the Snackbar widget that informs the user that the app needs access to the cameras.
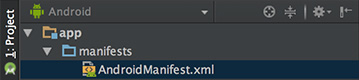
Using the Cameras
FaceSpotter specifies that it uses the camera and requests the user’s permission to do so with these lines in AndroidManifest.xml:
<uses-feature android:name="android.hardware.camera" />

<uses-permission android:name="android.permission.CAMERA" />
Pre-defined Classes
The starter project comes with a few pre-defined classes:
- FaceActivity: The main activity of the app which shows the camera preview.
- FaceTracker: Follows faces that are detected in images from the camera, and gathers their positions and landmarks.
- FaceGraphic: Draws the computer-generated images over faces in the camera images.
- FaceData: A data class for passing
FaceTrackerdata toFaceGraphic. - EyePhysics: Provided by Google in their Mobile Vision sample apps on GitHub, it’s a simple physics engine that will animate the AR irises as the faces they’re on move.
- CameraSourcePreview: Another class from Google. It displays the live image data from the camera in a view.
- GraphicOverlay: One more Google class;
FaceGraphicsubclasses it.
Let’s take a moment to get familiar with how they work.
FaceActivity defines the app’s only activity, and along with handling touch events, also requests for permission to access the device’s camera at runtime (applies to Android 6.0 and above). FaceActivity also creates two objects which FaceSpotter depends on, namely CameraSource and FaceDetector.
Open FaceActivity.java and look for the
createCameraSource method:
private void createCameraSource() {

  Context context = getApplicationContext();

  // 1

  FaceDetector detector = createFaceDetector(context);

  // 2

  int facing = CameraSource.CAMERA_FACING_FRONT;

  if (!mIsFrontFacing) {

    facing = CameraSource.CAMERA_FACING_BACK;
}


  // 3

  mCameraSource = new CameraSource.Builder(context, detector)
.setFacing(facing)

    .setRequestedPreviewSize(320, 240)

    .setRequestedFps(60.0f)

    .setAutoFocusEnabled(true)

    .build();

}
Here’s what the above code does:
- Creates a
FaceDetectorobject, which detects faces in images from the camera’s data stream. - Determines which camera is currently the active one.
- Uses the results of steps 1 and 2 and the Builder pattern to create the camera source. The builder methods are:
- setFacing: Specifies which camera to use.
- setRequestedPreviewSize: Sets the resolution of the preview image from the camera. Lower resolutions (like the 320×240 resolution specified) work better with budget devices and provide faster face detection. Higher resolutions (640×480 and higher) are for higher-end devices and offer better detection of small faces and facial features. Try out different settings.
- setRequestedFps: Sets the camera frame rate. Higher rates mean better face tracking, but use more processor power. Experiment with different frame rates.
- setAutoFocusEnabled: Turns autofocus off or on. Keep this set to true for better face detection and user experience. This has no effect if the device doesn’t have autofocus.
Now let’s check out the
createFaceDetector method:
@NonNull

private FaceDetector createFaceDetector(final Context context) {

  // 1

  FaceDetector detector = new FaceDetector.Builder(context)

    .setLandmarkType(FaceDetector.ALL_LANDMARKS)

    .setClassificationType(FaceDetector.ALL_CLASSIFICATIONS)

    .setTrackingEnabled(true)

    .setMode(FaceDetector.FAST_MODE)

    .setProminentFaceOnly(mIsFrontFacing)

    .setMinFaceSize(mIsFrontFacing ? 0.35f : 0.15f)

    .build();

  // 2

  MultiProcessor.Factory<Face> factory = new MultiProcessor.Factory<Face>() {

    @Override

    public Tracker<Face> create(Face face) {

      return new FaceTracker(mGraphicOverlay, context, mIsFrontFacing);
}
  };


  // 3

  Detector.Processor<Face> processor = new MultiProcessor.Builder<>(factory).build();
detector.setProcessor(processor);


  // 4

  if (!detector.isOperational()) {

    Log.w(TAG, "Face detector dependencies are not yet available.");

    // Check the device's storage.  If there's little available storage, the native

    // face detection library will not be downloaded, and the app won't work,

    // so notify the user.

    IntentFilter lowStorageFilter = new IntentFilter(Intent.ACTION_DEVICE_STORAGE_LOW);

    boolean hasLowStorage = registerReceiver(null, lowStorageFilter) != null;

    if (hasLowStorage) {

      Log.w(TAG, getString(R.string.low_storage_error));

      DialogInterface.OnClickListener listener = new DialogInterface.OnClickListener() {

        public void onClick(DialogInterface dialog, int id) {

          finish();
}
      };

      AlertDialog.Builder builder = new AlertDialog.Builder(this);

      builder.setTitle(R.string.app_name)

        .setMessage(R.string.low_storage_error)

        .setPositiveButton(R.string.disappointed_ok, listener)
.show();
    }
  }

  return detector;

}
Taking the above comment-by-comment:
- Creates a
FaceDetectorobject using the Builder pattern, and sets the following properties:- setLandmarkType: Set to
NO_LANDMARKSif it should not detect facial landmarks (this makes face detection faster) orALL_LANDMARKSif landmarks should be detected. - setClassificationType: Set to
NO_CLASSIFICATIONSif it should not detect whether subjects’ eyes are open or closed or if they’re smiling (which speeds up face detection) orALL_CLASSIFICATIONSif it should detect them. - setTrackingEnabled: Enables/disables face tracking, which maintains a consistent ID for each face from frame to frame. Since you need face tracking to process live video and multiple faces, set this to true.
- setMode: Set to
FAST_MODEto detect fewer faces (but more quickly), orACCURATE_MODEto detect more faces (but more slowly) and to detect the Euler Y angles of faces (we’ll cover this topic later). - setProminentFaceOnly: Set to
trueto detect only the most prominent face in the frame. - setMinFaceSize: Specifies the smallest face size that will be detected, expressed as a proportion of the width of the face relative to the width of the image.
- setLandmarkType: Set to
- Creates a factory class that creates new
FaceTrackerinstances. - When a face detector detects a face, it passes the result to a processor, which determines what actions should be taken. If you wanted to deal with only one face at a time, you’d use an instance of
Processor. In this app, you’ll handle multiple faces, so you’ll create aMultiProcessorinstance, which creates a newFaceTrackerinstance for each detected face. Once created, we connect the processor to the detector. - The face detection library downloads as the app is installed. It’s large enough that there’s a chance that it may not be downloaded when the user runs the app for the first time. This code handles that case, as well as the when the device doesn’t have enough storage for the library.
With the intro taken care of, it’s time to detect some faces!
Finding Faces
First you add a view into the overlay to draw detected face data.
Open FaceGraphic.java. You may have noticed the declaration for the instance variable
mFace is marked with the keyword volatile. mFace stores face data sent from FaceTracker, and may be written to by many threads. Marking it as volatile guarantees that you always get the result of the latest “write” any time you read its value. This is important since face data will change very quickly.
Delete the existing
draw() and add the following to FaceGraphic:
// 1

void update(Face face) {

  mFace = face;

  postInvalidate(); // Trigger a redraw of the graphic (i.e. cause draw() to be called).

}

@Override

public void draw(Canvas canvas) {

  // 2

  // Confirm that the face and its features are still visible

  // before drawing any graphics over it.

  Face face = mFace;

  if (face == null) {

    return;

  }

  // 3

  float centerX = translateX(face.getPosition().x + face.getWidth() / 2.0f);

  float centerY = translateY(face.getPosition().y + face.getHeight() / 2.0f);

  float offsetX = scaleX(face.getWidth() / 2.0f);

  float offsetY = scaleY(face.getHeight() / 2.0f);

  // 4

  // Draw a box around the face.

  float left = centerX - offsetX;

  float right = centerX + offsetX;

  float top = centerY - offsetY;

  float bottom = centerY + offsetY;

  // 5

  canvas.drawRect(left, top, right, bottom, mHintOutlinePaint);

  // 6

  // Draw the face's id.

  canvas.drawText(String.format("id: %d", face.getId()), centerX, centerY, mHintTextPaint);

}
Here’s what that code does:
- When a
FaceTrackerinstance gets an update on a tracked face, it calls its correspondingFaceGraphicinstance’supdatemethod and passes it information about that face. The method saves that information inmFaceand then callsFaceGraphic’s parent class’postInvalidatemethod, which forces the graphic to redraw. - Before attempting to draw a box around the face, the
drawmethod checks to see if the face is still being tracked. If it is,mFacewill be non-null. - The x- and y-coordinates of the center of the face are calculated.
FaceTrackerprovides cameracoordinates, but you’re drawing toFaceGraphic’s view coordinates, so you useGraphicOverlay’stranslateXandtranslateYmethods to convertmFace’s camera coordinates to the view coordinates of the canvas. - Calculate the x-offsets for the left and right sides of the box and the y-offsets for the top and bottom. The difference between the camera’s and the view’s coordinate systems require you convert the face’s width and height using
GraphicOverlay’sscaleXandscaleYmethods. - Draw the box around the face using the calculated center coordinates and offsets.
- Draw the face’s
idusing the face’s center point as the starting coordinates.
The face detector in
FaceActivity sends information about faces it detects in the camera’s data stream to its assigned multiprocessor. For each detected face, the multiprocessor spawns a new FaceTracker instance.
Add the following methods to FaceTracker.java after the constructor:
// 1

@Override

public void onNewItem(int id, Face face) {

  mFaceGraphic = new FaceGraphic(mOverlay, mContext, mIsFrontFacing);
}


// 2

@Override

public void onUpdate(FaceDetector.Detections<Face> detectionResults, Face face) {

  mOverlay.add(mFaceGraphic);
mFaceGraphic.update(face);

// 3
}


@Override

public void onMissing(FaceDetector.Detections<Face> detectionResults) {

  mOverlay.remove(mFaceGraphic);
}


@Override

public void onDone() {

  mOverlay.remove(mFaceGraphic);

}
Here’s what each method does:
- onNewItem: Called when a new
Faceis detected and its tracking begins. You’re using it to create a new instance ofFaceGraphic, which makes sense: when a new face is detected, you want to create new AR images to draw over it. - onUpdate: Called when some property (position, angle, or state) of a tracked face changes. You’re using it to add the
FaceGraphicinstance to theGraphicOverlayand then callFaceGraphic’supdatemethod, which passes along the tracked face’s data. - onMissing and onDone: Called when a tracked face is assumed to be temporarily and permanently gone, respectively. Both remove the
FaceGraphicinstance from the overlay.
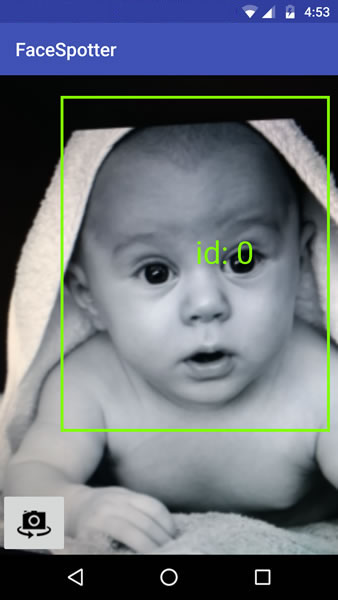
Run the app. It will draw a box around each face it detects, along with the corresponding ID number:
Landmarks Ahoy!
The Face API can identify the facial landmarks shown below.

You’ll modify the app so that it identifies the following for any tracked face:
- left eye
- right eye
- nose base
- mouth left
- mouth bottom
- mouth right
This information will be saved in a
FaceData object, instead of the provided Face object.
For facial landmarks, “left” and “right” refer to the subject’s left and right. Viewed through the front camera, the subject’s right eye will be closer to the right side of the screen, but through the rear camera, it’ll be closer to the left.
Open FaceTracker.java and modify
onUpdate() as shown below. The call to update() will momentarily cause a build error while you are in the process of modifying the app to use the FaceData model and you will fix it soon.
@Override

public void onUpdate(FaceDetector.Detections detectionResults, Face face) {

  mOverlay.add(mFaceGraphic);

  // Get face dimensions.

  mFaceData.setPosition(face.getPosition());
mFaceData.setWidth(face.getWidth());

  // Get the positions of facial landmarks.
mFaceData.setHeight(face.getHeight());


  updatePreviousLandmarkPositions(face);

  mFaceData.setLeftEyePosition(getLandmarkPosition(face, Landmark.LEFT_EYE));

  mFaceData.setRightEyePosition(getLandmarkPosition(face, Landmark.RIGHT_EYE));

  mFaceData.setMouthBottomPosition(getLandmarkPosition(face, Landmark.LEFT_CHEEK));

  mFaceData.setMouthBottomPosition(getLandmarkPosition(face, Landmark.RIGHT_CHEEK));
mFaceData.setNoseBasePosition(getLandmarkPosition(face, Landmark.NOSE_BASE));

  mFaceData.setMouthBottomPosition(getLandmarkPosition(face, Landmark.LEFT_EAR_TIP));
mFaceData.setMouthBottomPosition(getLandmarkPosition(face, Landmark.LEFT_EAR));

  mFaceData.setMouthBottomPosition(getLandmarkPosition(face, Landmark.RIGHT_EAR_TIP));
mFaceData.setMouthBottomPosition(getLandmarkPosition(face, Landmark.RIGHT_EAR));
  mFaceData.setMouthLeftPosition(getLandmarkPosition(face, Landmark.LEFT_MOUTH));

  mFaceData.setMouthRightPosition(getLandmarkPosition(face, Landmark.RIGHT_MOUTH));
mFaceData.setMouthBottomPosition(getLandmarkPosition(face, Landmark.BOTTOM_MOUTH));

  mFaceGraphic.update(mFaceData);

}
Note that you’re now passing a
FaceData instance to FaceGraphic’s update method instead of the Face instance that the onUpdate method receives.
This allows you to specify the face information passed to
FaceTracker, which in turn lets you use some math trickery based on the last known locations of facial landmarks when the faces are moving too quickly to approximate their current locations. You use mPreviousLandmarkPositions and the getLandmarkPosition and updatePreviousLandmarkPositions methods for this purpose.
Now open FaceGraphic.java.
First, since it’s now receiving a
FaceData value instead of a Face value from FaceTracker, you need to change a key instance variable declaration from:private volatile Face mFace;
to:
private volatile FaceData mFaceData;
Modify
update() to account for this change:
void update(FaceData faceData) {

  mFaceData = faceData;

  postInvalidate(); // Trigger a redraw of the graphic (i.e. cause draw() to be called).

}
And finally, you need to update
draw() to draw dots over the landmarks of any tracked face, and identifying text over those dots:
@Override

public void draw(Canvas canvas) {

  final float DOT_RADIUS = 3.0f;

  final float TEXT_OFFSET_Y = -30.0f;

  // Confirm that the face and its features are still visible before drawing any graphics over it.

  if (mFaceData == null) {

    return;

  }

  // 1

  PointF detectPosition = mFaceData.getPosition();

  PointF detectLeftEyePosition = mFaceData.getLeftEyePosition();

  PointF detectRightEyePosition = mFaceData.getRightEyePosition();
PointF detectNoseBasePosition = mFaceData.getNoseBasePosition();

  PointF detectMouthLeftPosition = mFaceData.getMouthLeftPosition();
PointF detectMouthBottomPosition = mFaceData.getMouthBottomPosition();

  if ((detectPosition == null) ||
PointF detectMouthRightPosition = mFaceData.getMouthRightPosition();

      (detectLeftEyePosition == null) ||

      (detectRightEyePosition == null) ||

      (detectNoseBasePosition == null) ||

      (detectMouthLeftPosition == null) ||

      (detectMouthBottomPosition == null) ||

      (detectMouthRightPosition == null)) {

    return;

  }

  // 2

  float leftEyeX = translateX(detectLeftEyePosition.x);

  float leftEyeY = translateY(detectLeftEyePosition.y);

  canvas.drawCircle(leftEyeX, leftEyeY, DOT_RADIUS, mHintOutlinePaint);

  canvas.drawText("left eye", leftEyeX, leftEyeY + TEXT_OFFSET_Y, mHintTextPaint);

  float rightEyeX = translateX(detectRightEyePosition.x);

  float rightEyeY = translateY(detectRightEyePosition.y);

  canvas.drawCircle(rightEyeX, rightEyeY, DOT_RADIUS, mHintOutlinePaint);

  canvas.drawText("right eye", rightEyeX, rightEyeY + TEXT_OFFSET_Y, mHintTextPaint);

  float noseBaseX = translateX(detectNoseBasePosition.x);

  float noseBaseY = translateY(detectNoseBasePosition.y);

  canvas.drawCircle(noseBaseX, noseBaseY, DOT_RADIUS, mHintOutlinePaint);

  canvas.drawText("nose base", noseBaseX, noseBaseY + TEXT_OFFSET_Y, mHintTextPaint);

  float mouthLeftX = translateX(detectMouthLeftPosition.x);

  float mouthLeftY = translateY(detectMouthLeftPosition.y);

  canvas.drawCircle(mouthLeftX, mouthLeftY, DOT_RADIUS, mHintOutlinePaint);

  canvas.drawText("mouth left", mouthLeftX, mouthLeftY + TEXT_OFFSET_Y, mHintTextPaint);

  float mouthRightX = translateX(detectMouthRightPosition.x);

  float mouthRightY = translateY(detectMouthRightPosition.y);

  canvas.drawCircle(mouthRightX, mouthRightY, DOT_RADIUS, mHintOutlinePaint);

  canvas.drawText("mouth right", mouthRightX, mouthRightY + TEXT_OFFSET_Y, mHintTextPaint);

  float mouthBottomX = translateX(detectMouthBottomPosition.x);

  float mouthBottomY = translateY(detectMouthBottomPosition.y);

  canvas.drawCircle(mouthBottomX, mouthBottomY, DOT_RADIUS, mHintOutlinePaint);

  canvas.drawText("mouth bottom", mouthBottomX, mouthBottomY + TEXT_OFFSET_Y, mHintTextPaint);

}
Here’s what you should note about this revised method:
- Because face data will change very quickly, these checks are necessary to confirm that any objects that you extract from
mFaceDataare notnullbefore using their data. Without these checks, the app will crash. - This part, which verbose, is fairly straightforward: it extracts the coordinates for each landmark and uses them to draw dots and identify text over the appropriate locations on the tracked face.
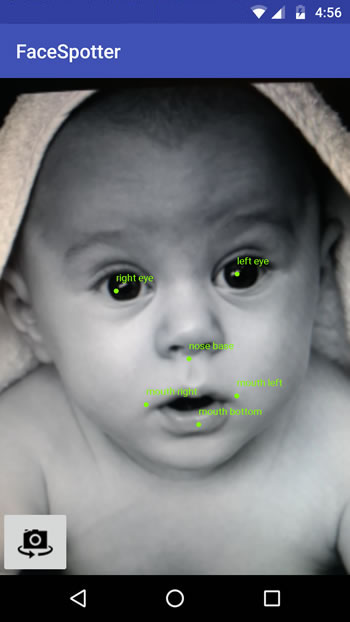
Run the app. You should get results similar to this…
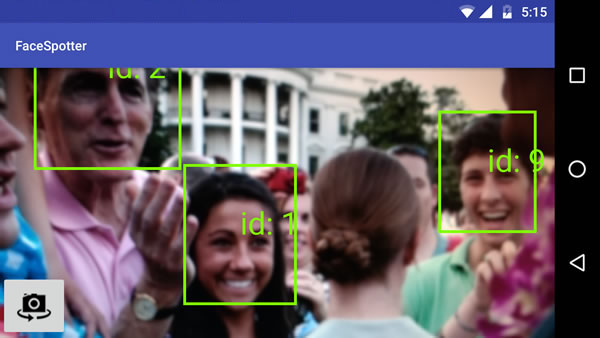
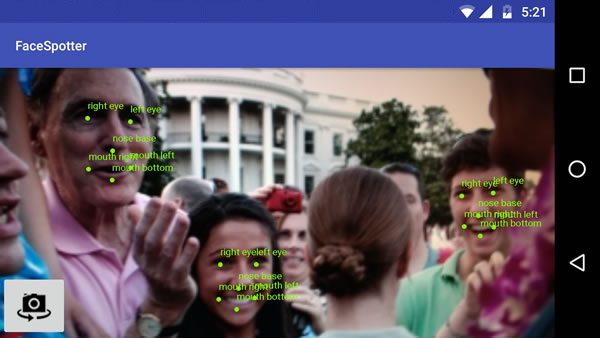
…or with multiple faces, results like this:
Now that you can identify landmarks on faces, you can start drawing cartoon features over them! But first, let’s talk about facial classifications.
Classifications
The
Face class provides classifications through these methods:- getIsLeftEyeOpenProbability and getIsRightEyeOpenProbability: The probability that the specified eye is open or closed, and
- getIsSmilingProbability: The probability that the face is smiling.
Both return
floats with a range of 0.0 (highly unlikely) to 1.0 (bet everything on it). You’ll use the results from these methods to determine whether an eye is open and whether a face is smiling and pass that information along to FaceGraphic.
Modify
FaceTracker to make use of classifications. First, add two new instance variables to the FaceTrackerclass to keep track of the previous eye states. As with landmarks, when subjects move around quickly, the detector may fail to determine eye states, and that’s when having the previous state comes in handy:
private boolean mPreviousIsLeftEyeOpen = true;

private boolean mPreviousIsRightEyeOpen = true;
onUpdate also needs to be updated as follows:
@Override

public void onUpdate(FaceDetector.Detections<Face> detectionResults, Face face) {

  mOverlay.add(mFaceGraphic);

  updatePreviousLandmarkPositions(face);

  // Get face dimensions.

  mFaceData.setPosition(face.getPosition());
mFaceData.setWidth(face.getWidth());

  // Get the positions of facial landmarks.
mFaceData.setHeight(face.getHeight());


  mFaceData.setLeftEyePosition(getLandmarkPosition(face, Landmark.LEFT_EYE));

  mFaceData.setRightEyePosition(getLandmarkPosition(face, Landmark.RIGHT_EYE));

  mFaceData.setMouthBottomPosition(getLandmarkPosition(face, Landmark.LEFT_CHEEK));

  mFaceData.setMouthBottomPosition(getLandmarkPosition(face, Landmark.RIGHT_CHEEK));
mFaceData.setNoseBasePosition(getLandmarkPosition(face, Landmark.NOSE_BASE));

  mFaceData.setMouthBottomPosition(getLandmarkPosition(face, Landmark.LEFT_EAR_TIP));
mFaceData.setMouthBottomPosition(getLandmarkPosition(face, Landmark.LEFT_EAR));

  mFaceData.setMouthBottomPosition(getLandmarkPosition(face, Landmark.RIGHT_EAR_TIP));
mFaceData.setMouthBottomPosition(getLandmarkPosition(face, Landmark.RIGHT_EAR));
  mFaceData.setMouthLeftPosition(getLandmarkPosition(face, Landmark.LEFT_MOUTH));

  mFaceData.setMouthRightPosition(getLandmarkPosition(face, Landmark.RIGHT_MOUTH));
mFaceData.setMouthBottomPosition(getLandmarkPosition(face, Landmark.BOTTOM_MOUTH));


  // 1

  final float EYE_CLOSED_THRESHOLD = 0.4f;

  float leftOpenScore = face.getIsLeftEyeOpenProbability();

  if (leftOpenScore == Face.UNCOMPUTED_PROBABILITY) {

    mFaceData.setLeftEyeOpen(mPreviousIsLeftEyeOpen);

  } else {

    mFaceData.setLeftEyeOpen(leftOpenScore > EYE_CLOSED_THRESHOLD);
mPreviousIsLeftEyeOpen = mFaceData.isLeftEyeOpen();
  }

  float rightOpenScore = face.getIsRightEyeOpenProbability();

  if (rightOpenScore == Face.UNCOMPUTED_PROBABILITY) {

    mFaceData.setRightEyeOpen(mPreviousIsRightEyeOpen);

  } else {

    mFaceData.setRightEyeOpen(rightOpenScore > EYE_CLOSED_THRESHOLD);
mPreviousIsRightEyeOpen = mFaceData.isRightEyeOpen();
  }


  // 2

  // See if there's a smile!

  // Determine if person is smiling.

  final float SMILING_THRESHOLD = 0.8f;

  mFaceData.setSmiling(face.getIsSmilingProbability() > SMILING_THRESHOLD);
mFaceGraphic.update(mFaceData);

}
Here are the changes:
FaceGraphicshould be responsible simply for drawing graphics over faces, not determining whether an eye is open or closed based on the face detector’s probability assessments. This means thatFaceTrackershould do those calculations and provideFaceGraphicwith ready-to-eat data in the form of aFaceDatainstance. These calculations take the results fromgetIsLeftEyeOpenProbabilityandgetIsRightEyeOpenProbabilityand turn them into a simpletrue/falsevalue. If the detector thinks that there’s a greater than 40% chance that an eye is open, it’s considered open.- You’ll do the same for smiling with
getIsSmilingProbability, but more strictly. If the detector thinks that there’s a greater than 80% chance that the face is smiling, it’s considered to be smiling.
Giving Faces the Cartoon Treatment
Now that you’re collecting landmarks and classifications, you can now overlay any tracked face with these cartoon features:
- Cartoon eyes over the real eyes, with each cartoon eye reflecting the real eye’s open/closed state
- A pig nose over the real nose
- A mustache
- If the tracked face is smiling, the cartoon irises in its cartoon eyes are rendered as smiling stars.
This requires the following changes to
FaceGraphic’s draw method:
@Override

public void draw(Canvas canvas) {

  final float DOT_RADIUS = 3.0f;

  final float TEXT_OFFSET_Y = -30.0f;

  // Confirm that the face and its features are still visible

  // before drawing any graphics over it.

  if (mFaceData == null) {

    return;

  }

  PointF detectPosition = mFaceData.getPosition();

  PointF detectLeftEyePosition = mFaceData.getLeftEyePosition();

  PointF detectRightEyePosition = mFaceData.getRightEyePosition();
PointF detectNoseBasePosition = mFaceData.getNoseBasePosition();

  PointF detectMouthLeftPosition = mFaceData.getMouthLeftPosition();
PointF detectMouthBottomPosition = mFaceData.getMouthBottomPosition();

  if ((detectPosition == null) ||
PointF detectMouthRightPosition = mFaceData.getMouthRightPosition();


      (detectLeftEyePosition == null) ||

      (detectRightEyePosition == null) ||

      (detectNoseBasePosition == null) ||

      (detectMouthLeftPosition == null) ||

      (detectMouthBottomPosition == null) ||

      (detectMouthRightPosition == null)) {

    return;

  }

  // Face position and dimensions

  PointF position = new PointF(translateX(detectPosition.x),

                               translateY(detectPosition.y));

  float width = scaleX(mFaceData.getWidth());

  float height = scaleY(mFaceData.getHeight());

  // Eye coordinates

  PointF leftEyePosition = new PointF(translateX(detectLeftEyePosition.x),
translateY(detectLeftEyePosition.y));

  PointF rightEyePosition = new PointF(translateX(detectRightEyePosition.x),
translateY(detectRightEyePosition.y));


  // Eye state

  boolean leftEyeOpen = mFaceData.isLeftEyeOpen();

  boolean rightEyeOpen = mFaceData.isRightEyeOpen();

  // Nose coordinates

  PointF noseBasePosition = new PointF(translateX(detectNoseBasePosition.x),
translateY(detectNoseBasePosition.y));


  // Mouth coordinates

  PointF mouthLeftPosition = new PointF(translateX(detectMouthLeftPosition.x),
translateY(detectMouthLeftPosition.y));

  PointF mouthRightPosition = new PointF(translateX(detectMouthRightPosition.x),
translateY(detectMouthRightPosition.y));

  PointF mouthBottomPosition = new PointF(translateX(detectMouthBottomPosition.x),
translateY(detectMouthBottomPosition.y));


  // Smile state

  boolean smiling = mFaceData.isSmiling();

  // Calculate the distance between the eyes using Pythagoras' formula,

  // and we'll use that distance to set the size of the eyes and irises.

  final float EYE_RADIUS_PROPORTION = 0.45f;

  final float IRIS_RADIUS_PROPORTION = EYE_RADIUS_PROPORTION / 2.0f;

  float distance = (float) Math.sqrt(

    (rightEyePosition.x - leftEyePosition.x) * (rightEyePosition.x - leftEyePosition.x) +

      (rightEyePosition.y - leftEyePosition.y) * (rightEyePosition.y - leftEyePosition.y));

  float eyeRadius = EYE_RADIUS_PROPORTION * distance;

  float irisRadius = IRIS_RADIUS_PROPORTION * distance;

  // Draw the eyes.

  drawEye(canvas, leftEyePosition, eyeRadius, leftEyePosition, irisRadius, leftEyeOpen, smiling);

  drawEye(canvas, rightEyePosition, eyeRadius, rightEyePosition, irisRadius, rightEyeOpen, smiling);

  // Draw the nose.

  drawNose(canvas, noseBasePosition, leftEyePosition, rightEyePosition, width);

  // Draw the mustache.

  drawMustache(canvas, noseBasePosition, mouthLeftPosition, mouthRightPosition);

}
…and add the following methods to draw the eyes, nose, and mustache:
private void drawEye(Canvas canvas,

                     PointF eyePosition, float eyeRadius,

                     PointF irisPosition, float irisRadius,

                     boolean eyeOpen, boolean smiling) {

  if (eyeOpen) {

    canvas.drawCircle(eyePosition.x, eyePosition.y, eyeRadius, mEyeWhitePaint);

    if (smiling) {

      mHappyStarGraphic.setBounds(

        (int)(irisPosition.x - irisRadius),

        (int)(irisPosition.y - irisRadius),

        (int)(irisPosition.x + irisRadius),

        (int)(irisPosition.y + irisRadius));

      mHappyStarGraphic.draw(canvas);

    } else {

      canvas.drawCircle(irisPosition.x, irisPosition.y, irisRadius, mIrisPaint);
}

  } else {

    canvas.drawCircle(eyePosition.x, eyePosition.y, eyeRadius, mEyelidPaint);

    float y = eyePosition.y;

    float start = eyePosition.x - eyeRadius;

    float end = eyePosition.x + eyeRadius;

    canvas.drawLine(start, y, end, y, mEyeOutlinePaint);
}

  canvas.drawCircle(eyePosition.x, eyePosition.y, eyeRadius, mEyeOutlinePaint);
}


private void drawNose(Canvas canvas,

                      PointF noseBasePosition,

                      PointF leftEyePosition, PointF rightEyePosition,

                      float faceWidth) {

  final float NOSE_FACE_WIDTH_RATIO = (float)(1 / 5.0);

  float noseWidth = faceWidth * NOSE_FACE_WIDTH_RATIO;

  int left = (int)(noseBasePosition.x - (noseWidth / 2));

  int right = (int)(noseBasePosition.x + (noseWidth / 2));

  int top = (int)(leftEyePosition.y + rightEyePosition.y) / 2;

  int bottom = (int)noseBasePosition.y;

  mPigNoseGraphic.setBounds(left, top, right, bottom);
mPigNoseGraphic.draw(canvas);
}


private void drawMustache(Canvas canvas,

                          PointF noseBasePosition,

                          PointF mouthLeftPosition, PointF mouthRightPosition) {

  int left = (int)mouthLeftPosition.x;

  int top = (int)noseBasePosition.y;

  int right = (int)mouthRightPosition.x;

  int bottom = (int)Math.min(mouthLeftPosition.y, mouthRightPosition.y);

  if (mIsFrontFacing) {

    mMustacheGraphic.setBounds(left, top, right, bottom);

  } else {

    mMustacheGraphic.setBounds(right, top, left, bottom);
}
  mMustacheGraphic.draw(canvas);

}
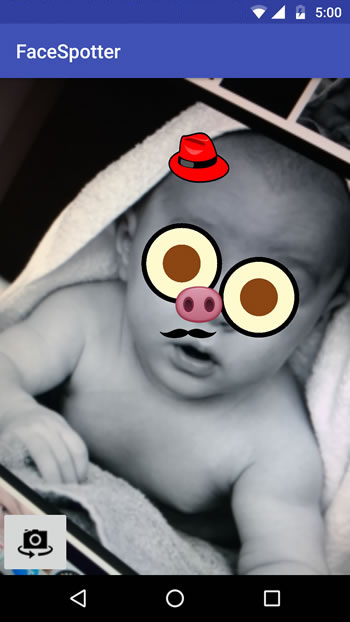
Run the app and start pointing the camera at faces. For non-smiling faces with both eyes open, you should see something like this:
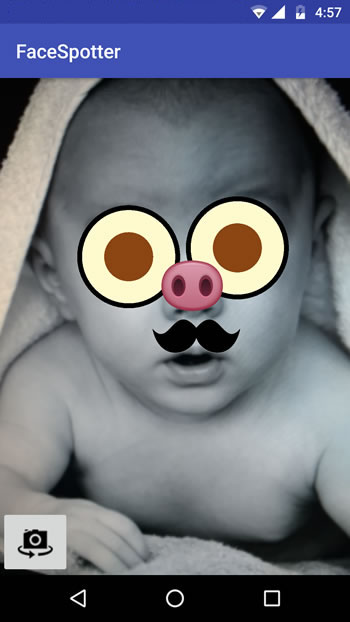
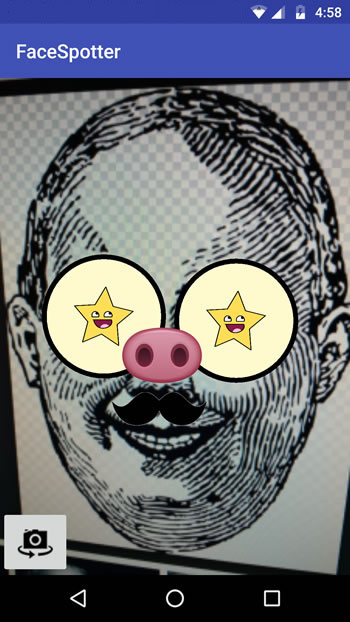
This one’s of me winking with my right eye (hence it’s closed) and smiling (which is why my iris is a smiling star):

The app will draw cartoon features over a small number of faces simultaneously…
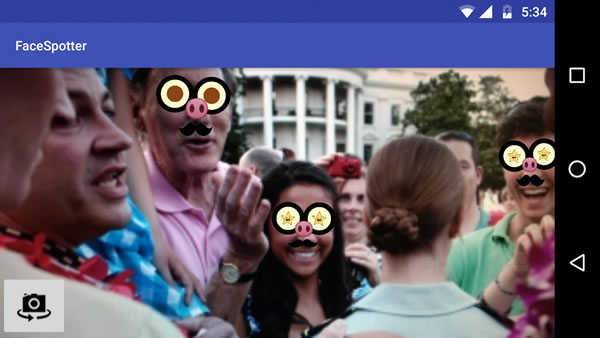
…and even over faces in illustrations if they’re realistic enough:
It’s a lot more like Snapchat now!
What’s Your Angle?
The Face API provides another measurement: Euler angles.
Pronounced “Oiler” and named after mathematician Leonhard Euler, these describe the orientation of detected faces. The API uses the x-, y-, and z- coordinate system below.
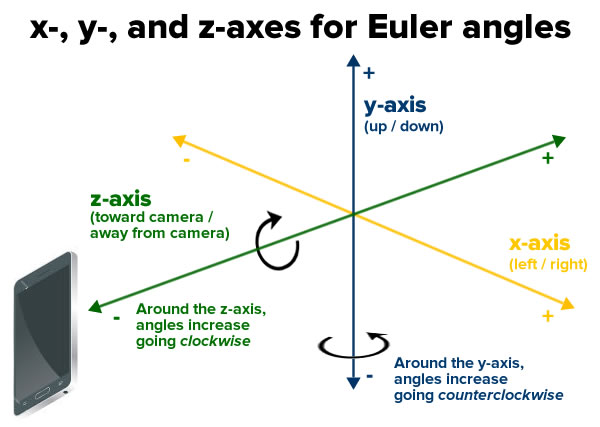
…and reports the following Euler angles for each detected face.
- The Euler y angle, which is its angle rotation around the y-axis. When you shake your head to say “no” as shown below, you’re rotating your head back and forth around the y-axis. This angle is detected only if the detector is set to
ACCURATE_MODE. - The Euler z angle, which measures its rotation around the z-axis. When you bobble your head from side to side as illustrated below, you’re rotating your head back and forth around the z-axis.


Open FaceTracker.java and add support for Euler angles by adding these lines to its
onUpdate() method, after the call to updatePreviousLandmarkPositions:// Get head angles.
mFaceData.setEulerY(face.getEulerY());
mFaceData.setEulerZ(face.getEulerZ());
You’ll make use of the Euler z angle to modify
FaceGraphic so that it draws a hat on any face whose Euler z angle is greater than 20 degrees to one side.
Open FaceGraphic.java and add the following to the end of
draw:// Head tilt
float eulerY = mFaceData.getEulerY();
float eulerZ = mFaceData.getEulerZ();
// Draw the hat only if the subject's head is titled at a sufficiently jaunty angle.
final float HEAD_TILT_HAT_THRESHOLD = 20.0f;
if (Math.abs(eulerZ) > HEAD_TILT_HAT_THRESHOLD) {
drawHat(canvas, position, width, height, noseBasePosition);
}
…and add the following
drawHat method to the end of the class:private void drawHat(Canvas canvas, PointF facePosition, float faceWidth, float faceHeight, PointF noseBasePosition) {
final float HAT_FACE_WIDTH_RATIO = (float)(1.0 / 4.0);
final float HAT_FACE_HEIGHT_RATIO = (float)(1.0 / 6.0);
final float HAT_CENTER_Y_OFFSET_FACTOR = (float)(1.0 / 8.0);
float hatCenterY = facePosition.y + (faceHeight * HAT_CENTER_Y_OFFSET_FACTOR);
float hatWidth = faceWidth * HAT_FACE_WIDTH_RATIO;
float hatHeight = faceHeight * HAT_FACE_HEIGHT_RATIO;
int left = (int)(noseBasePosition.x - (hatWidth / 2));
int right = (int)(noseBasePosition.x + (hatWidth / 2));
int top = (int)(hatCenterY - (hatHeight / 2));
int bottom = (int)(hatCenterY + (hatHeight / 2));
mHatGraphic.setBounds(left, top, right, bottom);
mHatGraphic.draw(canvas);
}
Run the app. Now a cute little hat will appear near the top of any head titled at a jaunty angle:
Bouncing Irises
Finally, you’ll use a simple physics engine to make the irises bounce around. This requires two simple changes to
FaceGraphic. First, you need to declare two new instance variables, which provide a physics engine for each eye. Put these just below the declaration for the Drawable instance variables:// We want each iris to move independently, so each one gets its own physics engine.
private EyePhysics mLeftPhysics = new EyePhysics();
private EyePhysics mRightPhysics = new EyePhysics();
The second change goes in the call to
FaceGraphic’s draw method. Until now, you’ve set the iris positions to the same coordinates as the eye positions.
Now, modify the code in
draw’s “draw the eyes” section to use the physics engines to determine each iris’ position:// Draw the eyes.
PointF leftIrisPosition = mLeftPhysics.nextIrisPosition(leftEyePosition, eyeRadius, irisRadius);
drawEye(canvas, leftEyePosition, eyeRadius, leftIrisPosition, irisRadius, leftEyeOpen, smiling);
PointF rightIrisPosition = mRightPhysics.nextIrisPosition(rightEyePosition, eyeRadius, irisRadius);
drawEye(canvas, rightEyePosition, eyeRadius, rightIrisPosition, irisRadius, rightEyeOpen, smiling);
Run the app. Now everyone has googly (pun somewhat intended) eyes!

Where to Go From Here?

You can download the final project here.
You’ve made the journey from augmented reality and face detection newbie to…well, maybe not grizzled veteran, but someone who now knows how to make use of both in Android apps.
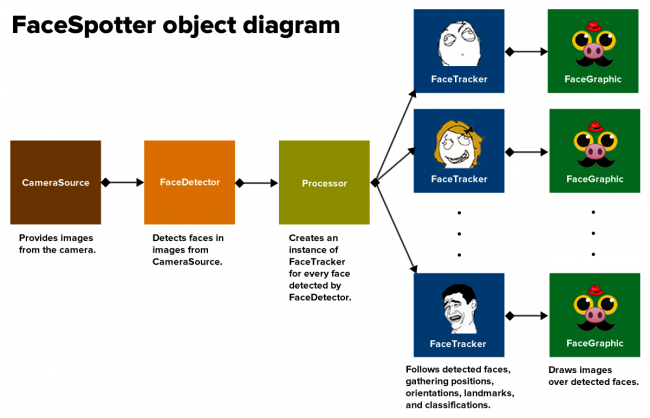
Now that you’ve gone through a few iterations of the app, from starter version to finished version, you should have no trouble understanding this diagram showing how FaceSpotter’s objects are related:
A good next step would be to take a closer look at Google’s Mobile Vision site, and particularly the section on the Face API.
Reading other people’s code is a great way to learn things, and Google’s android-vision GitHub repository is a treasure trove of ideas and code.
If you have any questions or comments, please join the discussion below!


